Introduction :
Autonomous cars have been a topic of increasing interest in recent years as many companies are actively developing related hardware and software technologies toward fully autonomous driving capability with no human intervention.
Deep neural networks (DNNs) have been successfully applied in various perception and control tasks in recent years.
They are important workloads for autonomous vehicles as well.
What is a Deep PiCar ?
Deep Picar is a small scale replication of a real self-driving car called DAVE-2 by NVIDIA. Using Deep Picar, we analyze the Raspberry Pi computing capabilities to support end-to-end deep learning based real-time control of autonomous vehicles.
Project Idea :
Controlling of the vehicles by switching from human-led driving to automated self-driving.
Supplies:
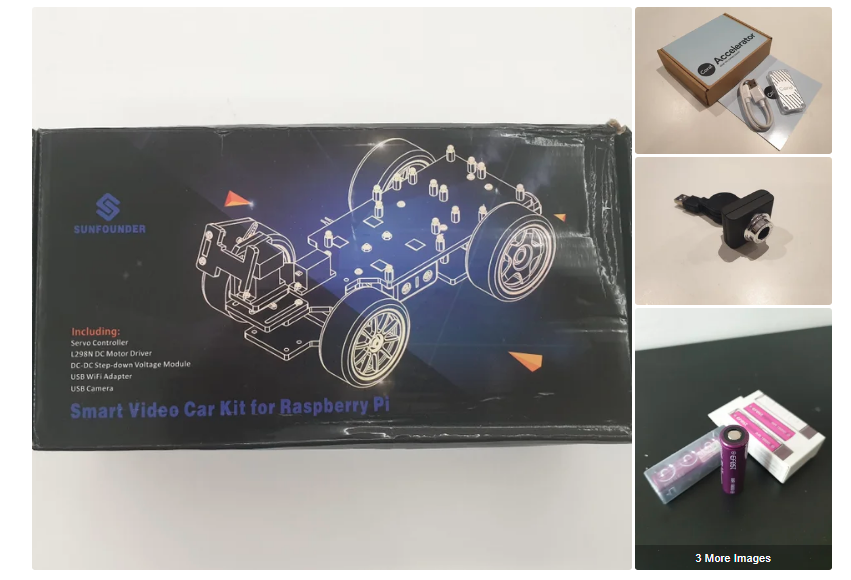
- PiCar-S Raspberry Pi Smart Robot Car Kit
- Raspberry Pi 3 ( Model B+ )
- Google Edge TPU coprocessor ( Accelerator )
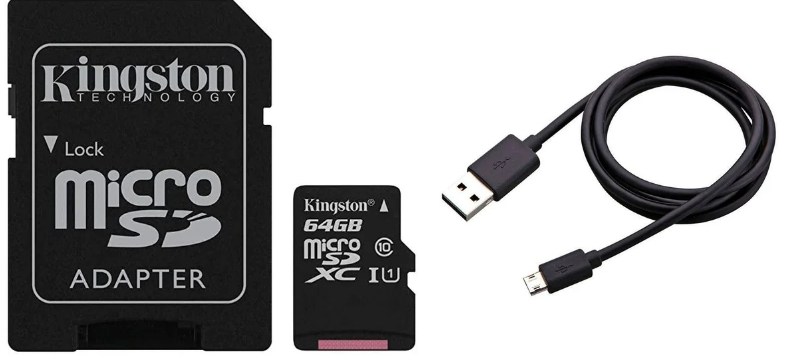
- Micro SD card 16GB
- Wide Angle USB Camera 1.3 megapixel with 170 degree fisheye Lens
- Adapter HDMI 90 Degree Angle
- Battery 18650 ( 3.7V )
- Battery charger
- Traffic signs
Step 1: Supplies Order
- PiCar-S Raspberry Pi Smart Robot Car Kit
https://www.sunfounder.com/products/raspberrypi-sensor-car
- Raspberry Pi 3 ( Model B+ )
https://ar.banggood.com/Raspberry-Pi-3-Model-B+-…..
- Google Edge TPU coprocessor ( Accelerator )
https://saudi.desertcart.com/products/125589101-go…
- Wide Angle USB Camera 1.3 megapixel with 170 degree fisheye Lens
USB Camera for PC or Raspberry Pi WebCam
- Adapter HDMI 90 Degree Angle
https://www.banggood.com/Ugreen-HD112-HDMI-Male-to…
- Battery 18650 ( 3.7V )
https://etqan.sa/product/18650-battery-3-7v-recha…
- Battery charger
- Micro SD card 16GB
- Traffic signs ( hand made )
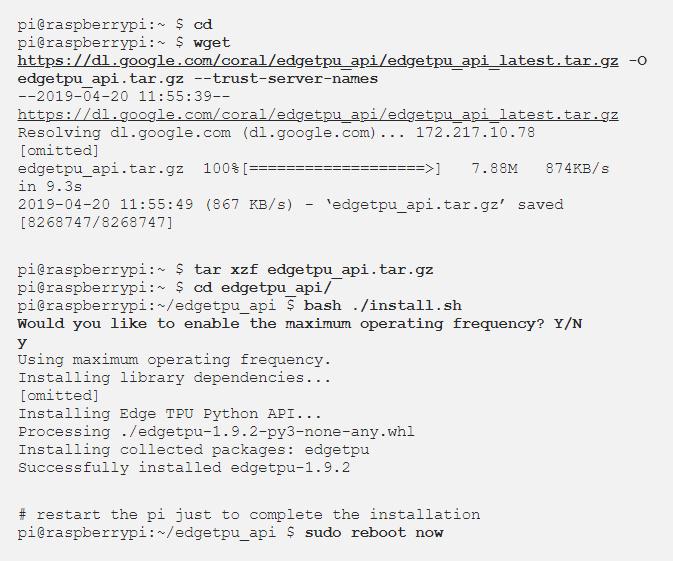
Step 2: About the Google Edge TPU Accelerator
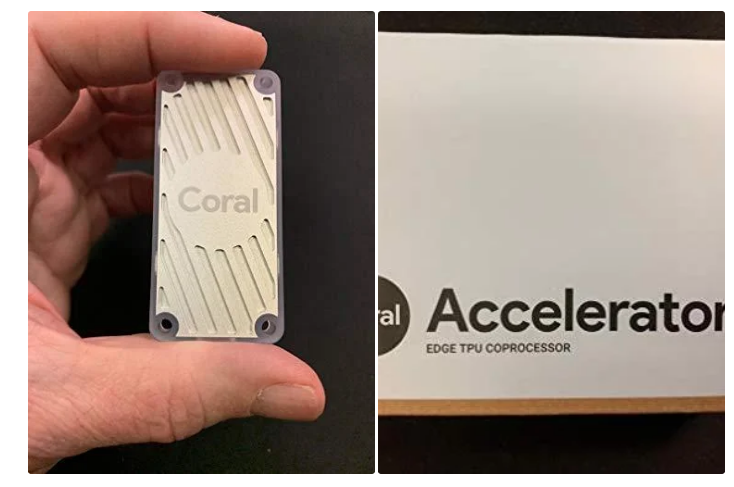
- Coral USB Accelerator brings powerful ML (machine learning)inferencing capabilities to existing Linux systems. Featuring the Edge TPU, a small ASIC designed and built by Google, the USB Accelerator provides high performance ML inferencing with a low power cost over a USB 3.0 interface.
- Edge TPU key benefits :- High speed Tensor Flow Lite inferencing- Low power- Small footprint
- Features : Google Edge TPU ML accelerator coprocessor USB 3.0 Type-C socket Supports Debian Linux on host CPU Models are built using Tensor Flow. Fully supports Mobile Net and Inception architectures though custom architectures are possible Compatible with Google Cloud.
- Coral, a division of Google, helps build intelligent ideas with a plat form for local AI.
- About the Accelerator – YouTube
Step 3: Raspberry Pi Setup
To do the setting for the Raspberry Pi you need to have :
- Micro SD card
- Micro usb cable
- Key board
- Mouse
- HDMI Monitor
- HDMI cable
steps of setting :
After you connected the micro SD card, start to down load the obrution system from the official website of the Raspberry Pi, https://www.raspberrypi.org/downloads/ ,use the NOBBS software and downloaded to the micro SD card by copping all the file on it. After that, insert the micro SD card to the Raspberry Pi and plug all the cable ( HDMI cable to the monitor, usb cable to ac, etc.), all the optional will seen on the screen.
Step 4: Assembling and Installing
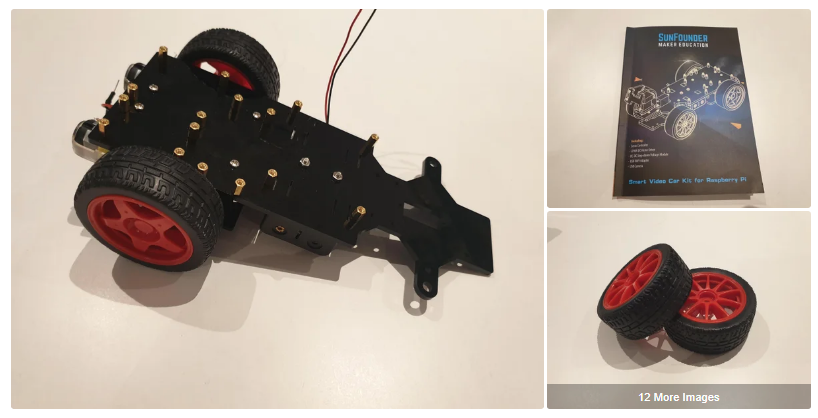
Using the instruction book, we start to install the PiCar kit, the kit is contain of :
- Instruction book
- Body of Picar
- DC motor
- DC motor driver (TRA9118A)
- Step-down DC-DC converter module
- servo motor
- pulse with modulation module (PWM PCA9685)
- Regulator
- USB camera
- USB module
- Batteries 18650 (3.7V)
- Batteries case
- Wheel (4)
- wires
- screw driver (different kind of it)
- Screws
Note 1: Before starting installation be sure every electronic parts of the kit working will, test them separately.
Note 2: If you using Raspberry Pi 3 and above, no need to install the antenna cause the raspberry has internal Wi fi and Bluetooth.
The assembly of the parts goes through several stages :
- Assembling of the acrylic Plates and wheel from the back side
- Installing the motor on it
- Servo Calibration – Operation on Raspberry Pi
Note: Before move on to the front part, since servos are used in back side, they need some configuration for protection. We need to make the servo rotate to the 90 degrees when it’s mounted, so the rotating range can match with the application in the car. Otherwise, damages may be caused to servos.
- Assembling of the acrylic Plates and wheel from the front side
- Electrical Module Assembly
- Circuit Connecting
Related video for installation :
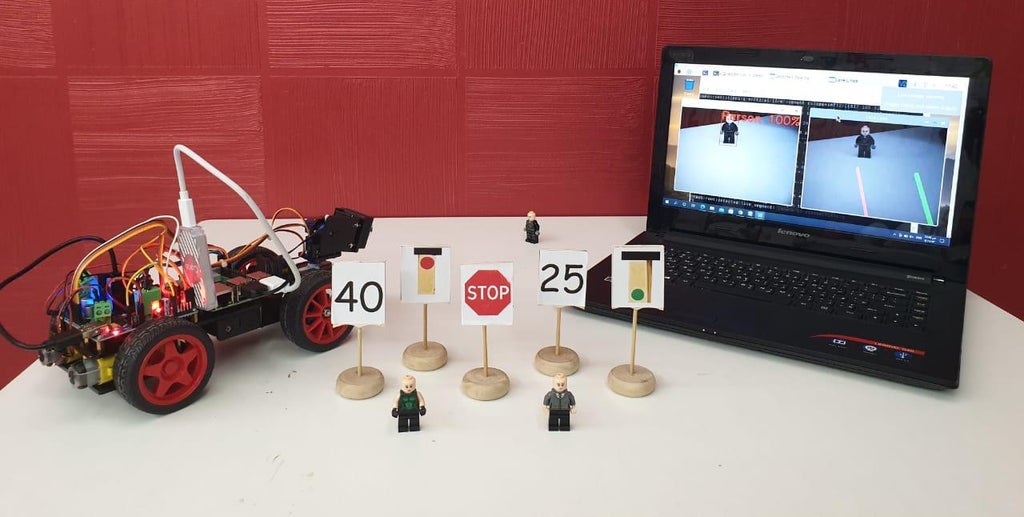
Step 5: Handcrafts

Little of handcrafts is needed to made the traffic sign and used with project.
Sign we used :
- Red traffic light
- Green traffic light
- Stop sign
- Speed sign
- Person ( we used a LEGO toys )
Related video for this step:
Step 6: Setup of Picar With the Raspberry Pi
- For the Google Edge TPU Accelerator, will set up all the Computer Vision and Deep Learning software needed. The main software tools we use are Python.(the de-facto programming language for Machine Learning/AI tasks), OpenCV (a powerful computer vision package) and Tensor flow (Google’s popular deep learning framework). Note: all the software we use here are FREE and open source.
- Raspberry Pi Operating System Set up
- Setup Remote Access (IP address/sudo/SSH/VNC)
- Setup Remote File Access
- Install USB Camera
- Get the source code, Download the source code directly from Github to your PC at: https://github.com/sunfounder/Sunfounder_Smart_Vid…
- Install Python software, Go to the Python website www.python.org, find the latest Python 3 and install. After installation, RESTART the computer then continue the setup as the instruction book write.
- Run cali_client
- Start Calibration
- Motor Adjustment
- Turning Adjustment
- Mount Adjustment
Step 7: Machine Learning and Practice
Before we start a deep learning, we should give the picar both an eye (camera and OpenCV) and a brain (Tensor Flow), so we have to follow this first :
- OpenCV for Computer Vision
- Install Open CV and Related Libraries
- Install Tensor Flow for Edge TPU
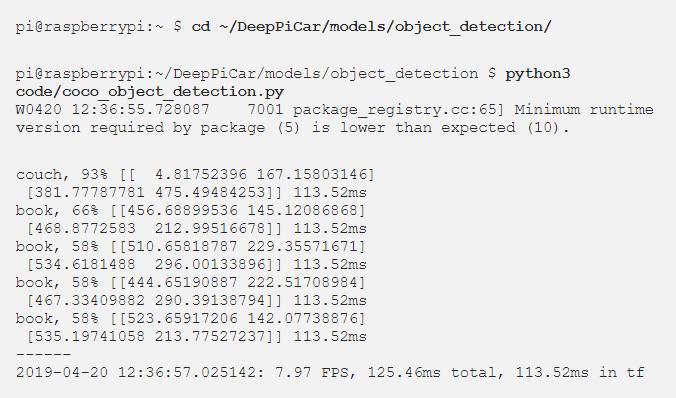
In this step, we will use deep learning techniques such as single shot multi-box object detection and transfer learning to teach DeepPiCar to detect various (miniature) traffic signs and pedestrians on the road. And then we will teach it to stop at red lights and stop signs, go on green lights, stop to wait for a pedestrian to cross, and change its speed limit according to the posted speed signs, and a lot of practice for the Picar.
Some of related video for machine learning and practice :
- machine learning
- practice video-1
- practice video-2
- practice video-3
- practice video-4
- End-to-end deep learning notebook
- “How to train an object detection model easy for free”
Optional :
- Course of machine learning https://www.coursera.org/learn/machine-learning
Step 8: Final Product Demonstration
In this step we demonstrate the final product, a simulation model of controlling vehicles without a human intervention.
Raspberry Pi Code
import logging
import picar
import cv2
import datetime
from hand_coded_lane_follower import HandCodedLaneFollower
from objects_on_road_processor import ObjectsOnRoadProcessor
import time
_SHOW_IMAGE = True


class DeepPiCar(object):

    __INITIAL_SPEED = 0
    __SCREEN_WIDTH = 340 #__SCREEN_WIDTH = 320
    __SCREEN_HEIGHT = 240

    def __init__(self):
        """ Init camera and wheels"""
        logging.info('Creating a DeepPiCar...')

        picar.setup()

        logging.debug('Set up camera')
        #self.camera = cv2.VideoCapture(-1)
        self.camera = cv2.VideoCapture(0)
        self.camera.set(3, self.__SCREEN_WIDTH)
        self.camera.set(4, self.__SCREEN_HEIGHT)

        self.pan_servo = picar.Servo.Servo(1)
      #  self.pan_servo.offset = -30  # calibrate servo to center
        self.pan_servo.offset = 0
        self.pan_servo.write(90)

        self.tilt_servo = picar.Servo.Servo(2)
       # self.tilt_servo.offset = 20  # calibrate servo to center
        self.tilt_servo.offset = 0
        self.tilt_servo.write(90)

        logging.debug('Set up back wheels')
        self.back_wheels = picar.back_wheels.Back_Wheels()
        self.back_wheels.speed = 0  # Speed Range is 0 (stop) - 100 (fastest)
        ###self.back_wheels.forward()
        logging.debug('Set up front wheels')
        self.front_wheels = picar.front_wheels.Front_Wheels()
        #self.front_wheels.turning_offset = -25  # calibrate servo to center
        self.front_wheels.turning_offset = 0
        self.front_wheels.turn(90)  # Steering Range is 45 (left) - 90 (center) - 135 (right)

        self.lane_follower = HandCodedLaneFollower(self)
        self.traffic_sign_processor = ObjectsOnRoadProcessor(self)
        # lane_follower = DeepLearningLaneFollower()

        self.fourcc = cv2.VideoWriter_fourcc(*'XVID')
        datestr = datetime.datetime.now().strftime("%y%m%d_%H%M%S")
        self.video_orig = self.create_video_recorder('../data/tmp/car_video%s.avi' % datestr)
        self.video_lane = self.create_video_recorder('../data/tmp/car_video_lane%s.avi' % datestr)
        self.video_objs = self.create_video_recorder('../data/tmp/car_video_objs%s.avi' % datestr)

        logging.info('Created a DeepPiCar')

    def create_video_recorder(self, path):
        return cv2.VideoWriter(path, self.fourcc, 20.0, (self.__SCREEN_WIDTH, self.__SCREEN_HEIGHT))
        #return cv2.VideoWriter(path, self.fourcc, 20.0, (self.__SCREEN_WIDTH, self.__SCREEN_HEIGHT))
    def __enter__(self):
        """ Entering a with statement """
        return self

    def __exit__(self, _type, value, traceback):
        """ Exit a with statement"""
        if traceback is not None:
            # Exception occurred:
            logging.error('Exiting with statement with exception %s' % traceback)

        self.cleanup()

    def cleanup(self):
        """ Reset the hardware"""
        logging.info('Stopping the car, resetting hardware.')
        self.back_wheels.speed = 0
        self.front_wheels.turn(90)
        self.camera.release()
        self.video_orig.release()
        self.video_lane.release()
        self.video_objs.release()
        cv2.destroyAllWindows()

    def drive(self, speed=__INITIAL_SPEED):
        """ Main entry point of the car, and put it in drive mode

        Keyword arguments:
        speed -- speed of back wheel, range is 0 (stop) - 100 (fastest)
        """

        logging.info('Starting to drive at speed %s...' % speed)
        self.back_wheels.speed = speed

        self.back_wheels.forward()
        i = 0
        while self.camera.isOpened():
            _, image_lane = self.camera.read()
            image_objs = image_lane.copy()
            i += 1
            self.video_orig.write(image_lane)

            image_objs = self.process_objects_on_road(image_objs)
            self.video_objs.write(image_objs)
            show_image('Detected Objects', image_objs)

            image_lane = self.follow_lane(image_lane)
            self.video_lane.write(image_lane)
            show_image('Lane Lines', image_lane)

            if cv2.waitKey(1) & 0xFF == ord('q'):
                self.cleanup()
                break

    def process_objects_on_road(self, image):
        image = self.traffic_sign_processor.process_objects_on_road(image)
        return image

    def follow_lane(self, image):
        image = self.lane_follower.follow_lane(image)
        return image


############################
# Utility Functions
############################
def show_image(title, frame, show=_SHOW_IMAGE):
    if show:
        cv2.imshow(title, frame)


def main():
    with DeepPiCar() as car:
        car.drive(17)


if __name__ == '__main__':
    logging.basicConfig(level=logging.DEBUG, format='%(levelname)-5s:%(asctime)s: %(message)s')

    main()<br>
Source: