Communication between Raspberry Pi and Arduino via USB-to-Serial

Individually Raspberry Pi or Arduino can make quite a lot of control experiments. But you may wonder, can the two be used at the same time? If so, how? Well, the key point here is to use the Raspberry Pi as a computing center for calculation and processing, while Arduino, as the executor for control and collection. Sometimes, you need some actual real-time control, like a controller for a 3D printer. However, the Raspbian is not fit for real-time operations, so the program cannot be run strictly routinely based on the same clock cycle just as it’s done on an MCU.
So, here we connect the two platforms via a USB-to-serial cable.
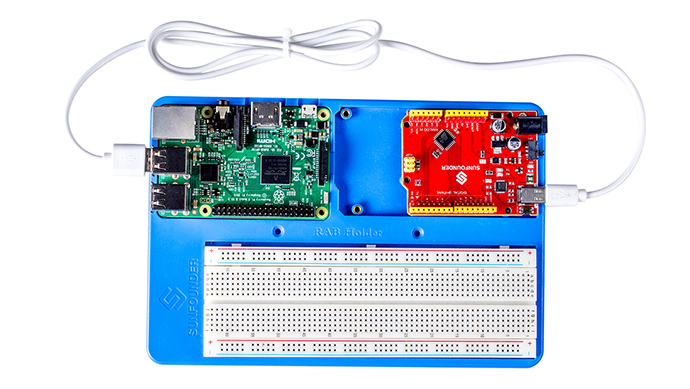
To fix the Raspberry Pi and Arduino, you can use the SunFounder RAB Holder
Just use a USB cable to connect the two.
Then type in lsusb in the Raspberry Pi terminal, and you can see the device has been connected: Arduino SA Uno R3; for other boards using FTDI, it should be Future Technology Devices International, Ltd FT232 USB-Serial (UART) IC.

1. Locate the Serial Port
Similar to connection between Arduino and PC, it also communicates with Raspberry Pi likewise via USB to serial. Therefore, you need to locate the serial port to connect.
Usually the device name of the serial port should be /dev/ttyACM0 or /dev/ttyUSB1 for FTDI. Otherwise, you can figure it out in other methods.
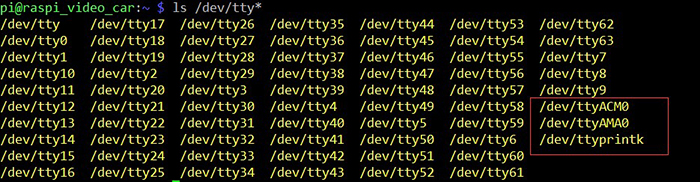
Connect the two board, type in ls /dev/tty*
This command is to print files whose name begins with tty under the directory /dev/.
Then disconnect the two, type in the command ls /dev/tty* again.
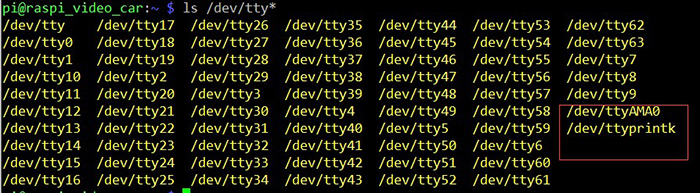
You can see a device name disappeared after the Arduino board is disconnected, meaning it’s the serial device name for the board. Here it is /dev/ttyACM0.
2. Communicate via the serial portd
To enable communication between Raspberry Pi and Arduino through serial, for Arduino you need to use the built-in Serial library, when for Raspberry Pi, pySerial, the module for serial communication in Python (https://github.com/pyserial/pyserial).
For how to send data from Arduino to Raspberry Pi via serial, take the example below:
Step 1: Unplug the USB cable from the Raspberry Pi, and plug it into the PC. Open Arduino IDE. If you haven’t installed one, go to www.arduino.cc, click Download and scroll down to find the latest version, download, unzip and install it. Create a new code file, copy the following code to it and save.
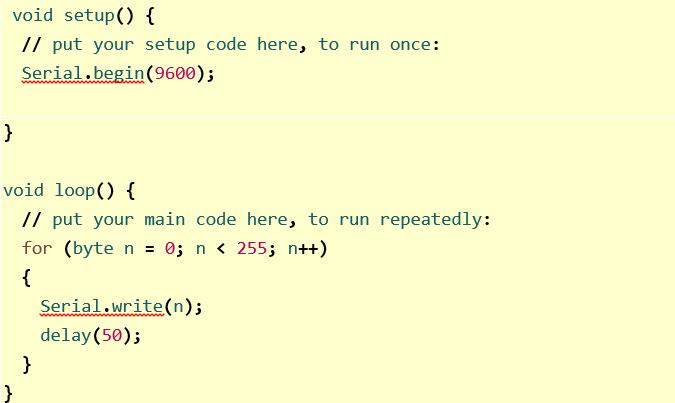
These lines are to send a number (ranging 0-255, ascending) to the serial port.
The Serial.write() function sends an actual number, not a string. To send strings, you need to use Serial.print().
Step 2: Create a Python script
nano pi_duino.py
Step 3: Open the file and copy the following code to it:
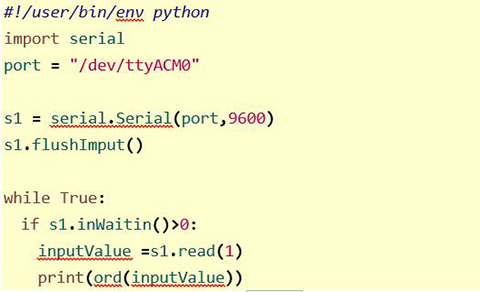
Note: If the serial device is not /dev/ttyACM0, remember to change it to the genuine one.
s1 = serial.Serial(port,9600) to create a serial object and name it s1; the serial port is named after the value of port, in a baud rate of 9600.
s1.flushInput(): for the serial object s1, clear the input buffer.
inputValue = s1.read(1): If data is received, read a byte from the serial buffer.
print(ord(inputValue)): Convert the byte of data read into an actual numeral with the ord() function.
Press Ctrl+X to exit. Type in y to save.
Step 4: Run the code.
python pi_duino.py
After it’s done, the program will print the data (an ascending numeral from 0 to 255) received via serial, from the Arduino board. Also the TX signal indicator LED of the Arduino board is blinking – every time a data is sent, it blinks once.
In the example above, the program sends only one byte each time. If you want to send some messages from Arduino, it’s possible.
Next, let’s move on to something a little bit complicated.
The Arduino sends messages of string, and the Raspberry Pi prints it after receiving, and then sends back a digital message to the Arduino, so the latter blinks the LED attached to pin 13 based on the message received.
Step 1: Edit the code in Arduino IDE and upload it to the board:
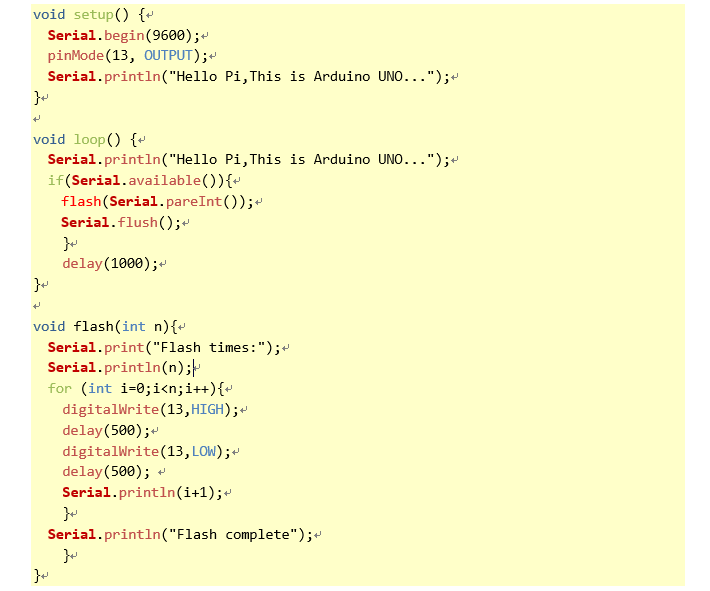
In the custom function flash(int n), the parameter n means times of LED blinking, so the function is to make the built-in LED on the Arduino board blink for n times.
The code is to send the message “Hello Pi,This is Arduino UNO…” to the serial port, transfer it to the flash() function, and then the LED will blink for n times.
flash(Serial.pareInt()) is to read the integer in the data from the serial port, take it for the parameter of flash(), namely, the integer of the times for blinking sent from the Raspberry Pi.
Step 2: Create a Python script
nano pi_duino.py
Step 3: Write the script on Raspberry Pi
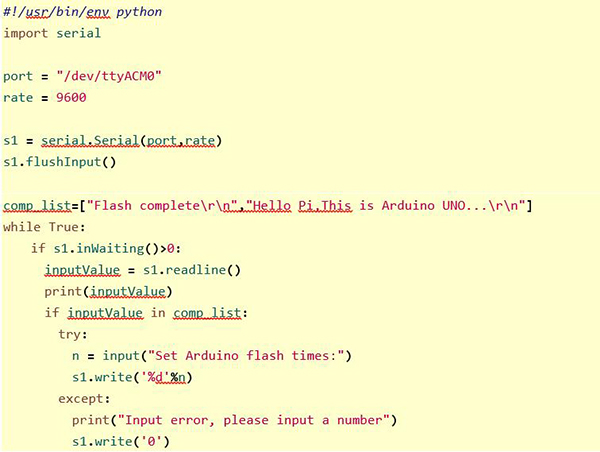
In this part, the program imports serial, the tool for serial communication with Python.
Same as the previous example, create a serial object and name it s1; the serial port is named after the value of port, in a baud rate of 9600.
In the main loop, use a judgement – check whether the message sent from the Arduino is matched with sentences in the comp_list, and trigger the request of input if yes. In other words, if the number of Arduino LED flashing times reaches the value set or the Arduino board is restarted, a sentence in the comp_list will be received, and thus the script will prompt you to enter a new number of LED flashing.
Step 4: Run the script and check
Connect the Arduino board with the Raspberry Pi via a USB cable. Based on the previous description, check the serial port of the Arduino. Change the port value in Python if it’s necessary.
Run the script:
python pi_duino.py
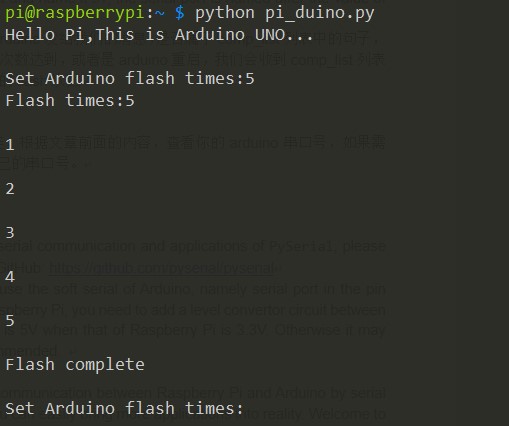
Enter an integer to define the flashing times of the LED on the Arduino board. check whether the LED blinks or not, and that the times of blinking complies with what you’ve set.
This example is quite simple – needs no more devices, only an Arduino board and a Raspberry Pi and their connection. During the implementation, you can see the phenomenon: in the initialization, the Arduino sends string messages to the Raspberry Pi, so it’s communication from Arduino to Raspberry Pi; then the Pi receives the message via serial port and processes it, so it’s the message processing; next, the Pi sends the processed data back to the Arduino via serial, so it’s Pi to Arduino; at last, the Arduino does what the Raspberry Pi “tells” it, and sends the feedback of completion to the Pi.
In this way, a complete communication process goes like this. Though it may be a little complicated, but it’s typical.
For more information like agreement of serial communication and applications of PySerial, please refer to the page of PySerial module on GitHub: https://github.com/pyserial/pyserial
What’s worth noticing is, if you want to use the soft serial of Arduino, namely serial port in the pin headers, to connect with those on the Raspberry Pi, you need to add a level convertor circuit between them, because the high level of Arduino is 5V when that of Raspberry Pi is 3.3V. Otherwise it may hurt the Raspberry Pi, which is not recommended.
So far you should be able to make the communication between Raspberry Pi and Arduino by serial port. Congrats! Well, with the skill got, you can easily bring more applications into reality. Welcome to share with us by comment or post on FORUM.